Good morning! Today’s post is a little different from my usual posts but I thought it was an interesting discovery and wanted to share it with you! Like many other papercrafters, I have recently been totally enamored by my Zig Clean Color Real Brush watercolor pens! I use them frequently and I have been relying on the color swatch cards originally released by Jennifer McGuire (as well as her tip for applying a colored dot of watercolor paper to the top of each pen cap and coverering it with glossy accents). However I’ve recently noticed that I would look at my swatch card, go looking for the coordinating pen cap, and have an awful time finding the right cap. I finally pulled out some of my pens and laid the cap top next to the swatch card…the colors weren’t even CLOSE to matching.
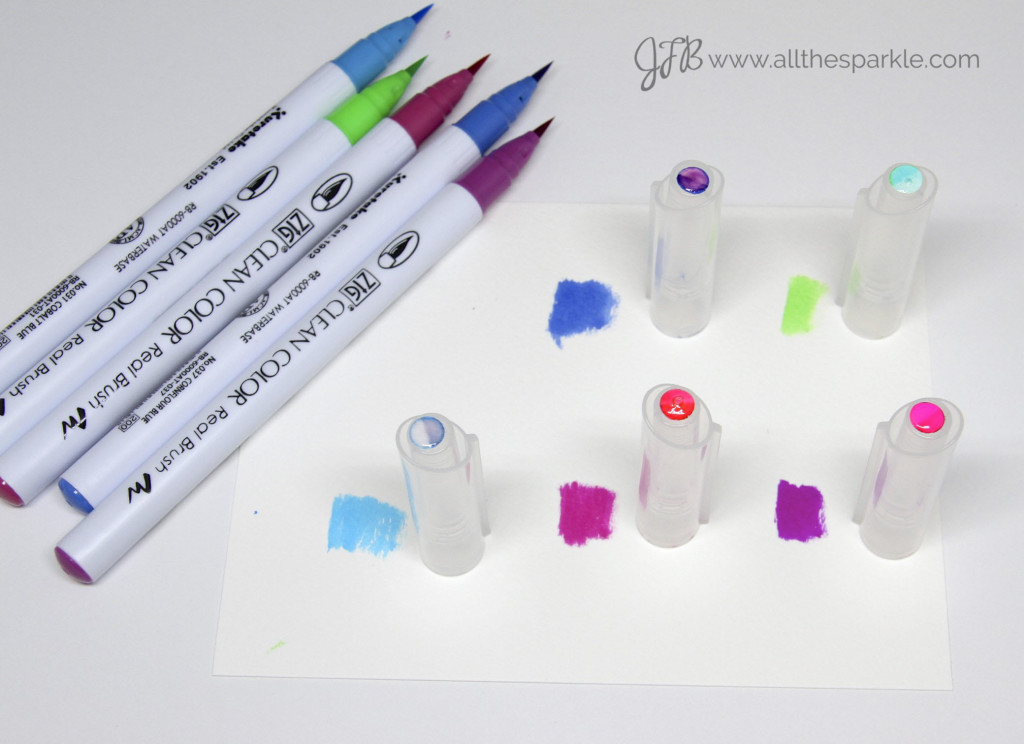
For a second I thought I had put the wrong cap on the pen until I kept looking…and realized that the majority of cap colors were nowhere close to the swatch card color. I scribbled the pens on watercolor paper and they matched the swatch card so the only possible cause for the discoloration was the glossy accents.
But just to double-check my theory, I scribbled the 082 Purple pen onto Tim Holtz watercolor paper, Canson watercolor paper, and Strathmore Bristol paper and did a little experiment. For two samples I scribbled a little of the pen on the paper and then used a water brush to blend it out a bit…for the other two I just scribbled the pen directly on the paper. On one of each sample I waited until the water was dry to the touch (about 30 minutes) and then applied a dot of glossy accents. On the other samples I waited a full 24 hours and then applied a dot of glossy accents. The bottom sample has not been altered in any way. As you can see, it didn’t matter how long I waited, the glossy accents totally discolored the sample.
On the Tim Holtz watercolor cardstock I added a dot on the control sample about 5 minutes before I took the photo…just to check and see how fast it would start to change. I also took a quick video adding a dot to another sample to show you how quickly it discolors. The purple is definitely the absolute worst with this issue but many of the markers do the same thing. I apologize for the not great quality of the video and above photos. Since I was waiting 24 hours for my experiment I was stuck taking photos and video at 1 am.
I’m sure there’s an interesting technique currently simmering away in my subconscious using glossy accents to change the colors of the pens; however, you can understand why it’s irritating to not have true colors on swatches when you go looking for a particular color.
These are my original pen cap dots…the colors are kinda dull and muddy looking and there seems to be a lot of similar shades:
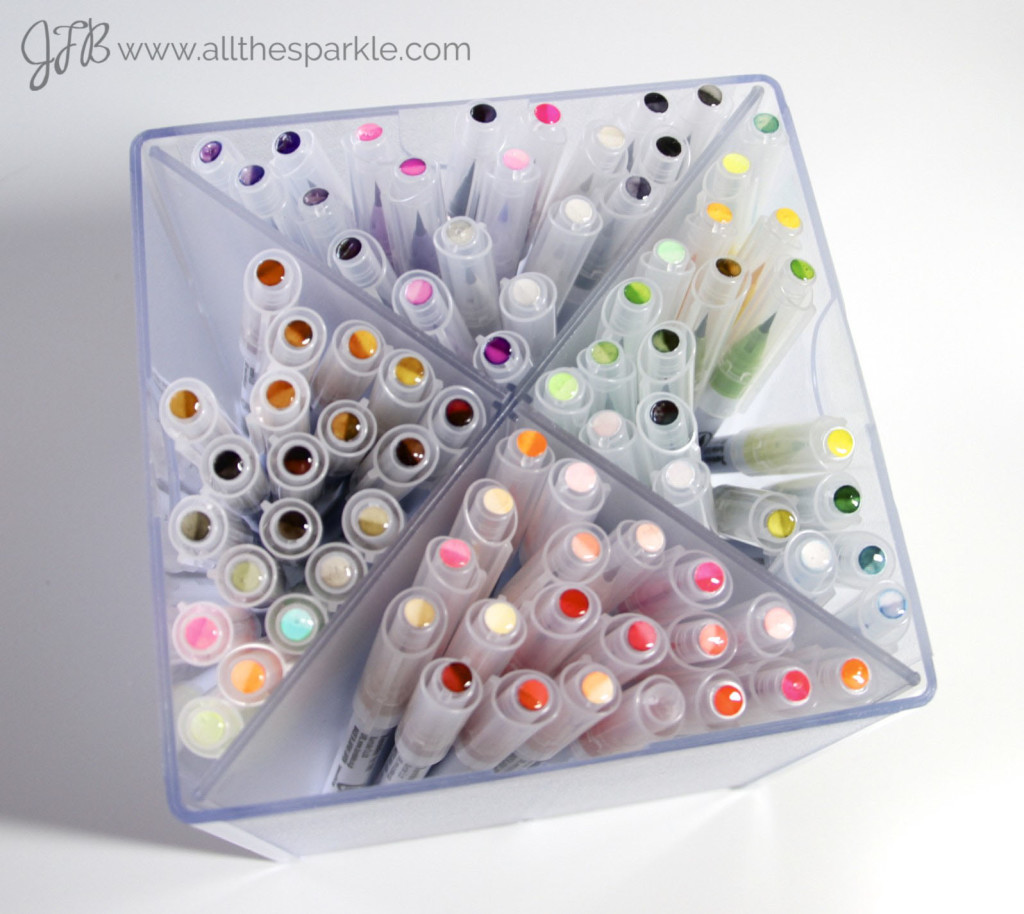
So I took off all the colored dots and re-colored fresh watercolor paper dots. I decided just to color the dots solid instead of using the waterbrush on half of the dot since the swatch cards show me exactly what the marker looks like with a waterbrush and it’s easier to see them this way. To seal them I pressed a versamark pad to the colors and heat-embossed it with clear embossing powder before hole-punching them and sticking them to the top of my pen caps with glue dots.
*If you don’t want to use embossing powder to seal the caps the fabulous Laurel Beard suggested using this fixative spray instead! I tend to get sprays all over myself (and my cat) but this would definitely be faster than embossing powder! 🙂
SO. MUCH. BETTER! Look at the vibrant (and different!) colors!
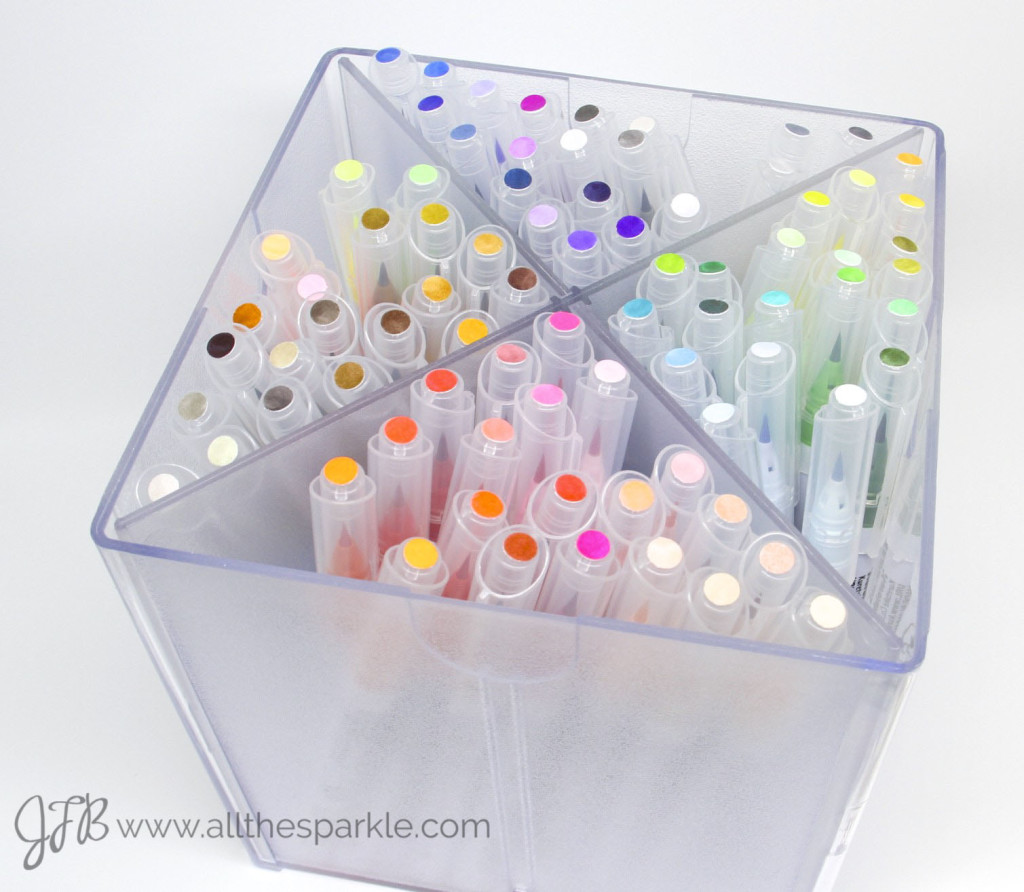
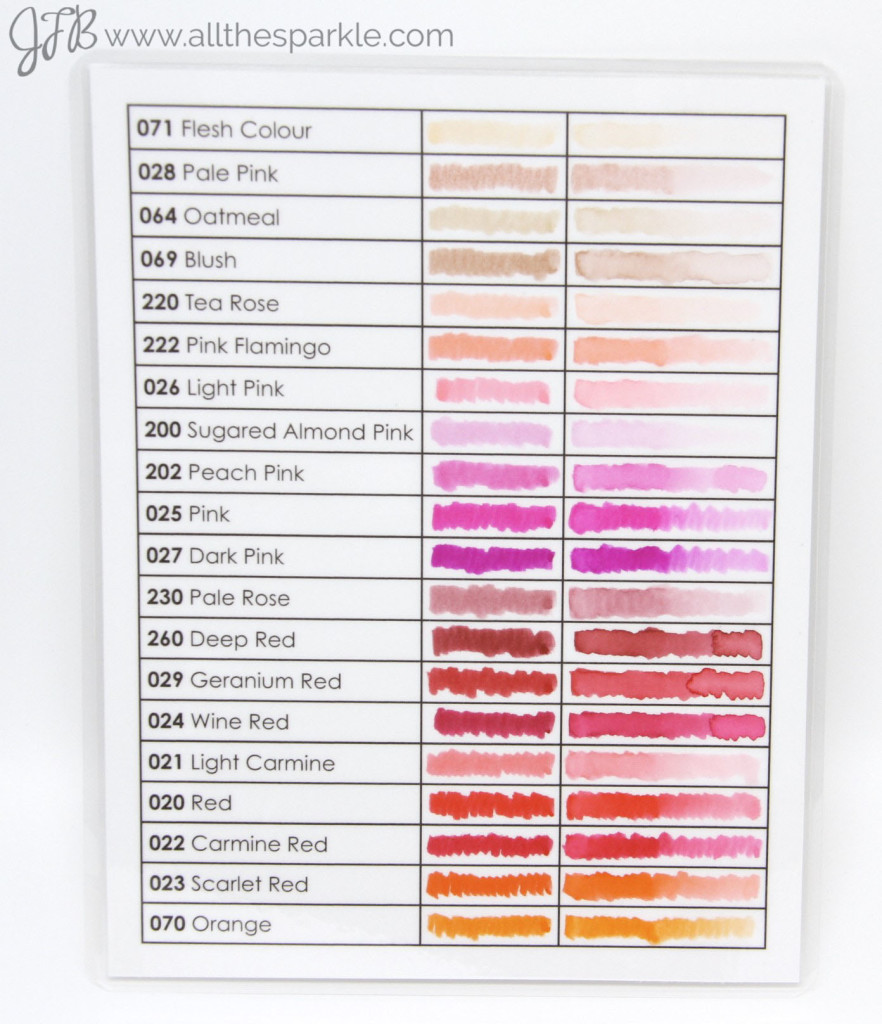
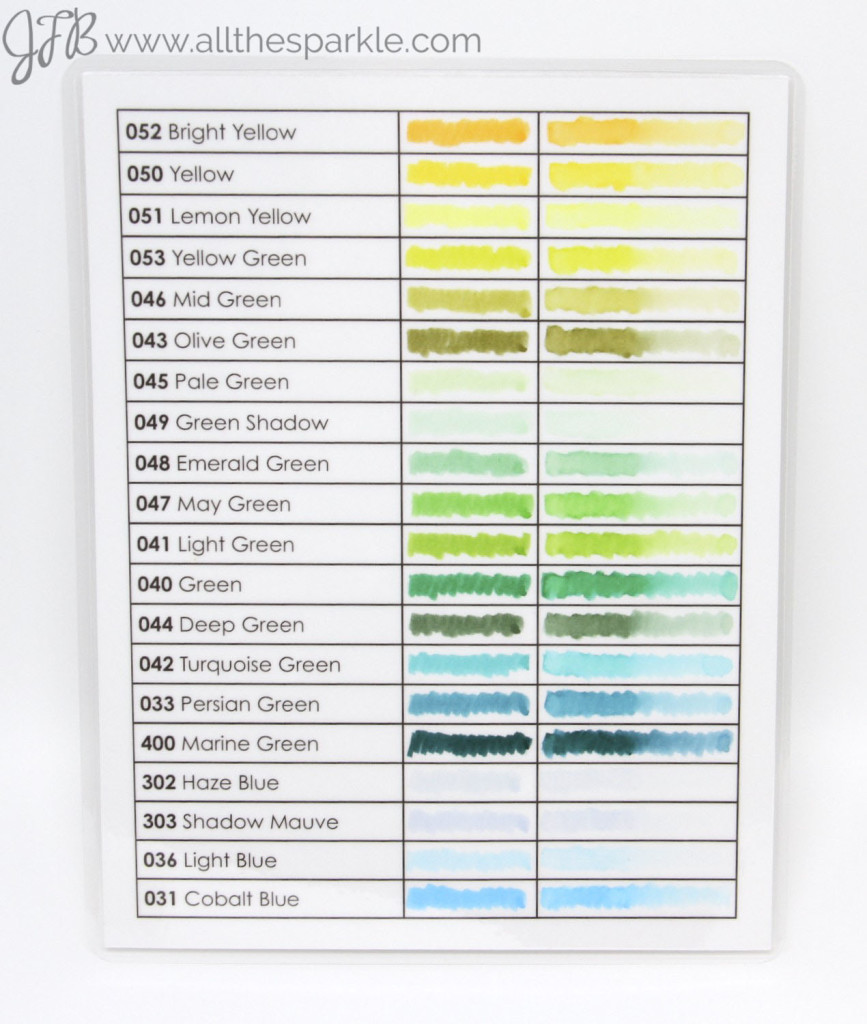
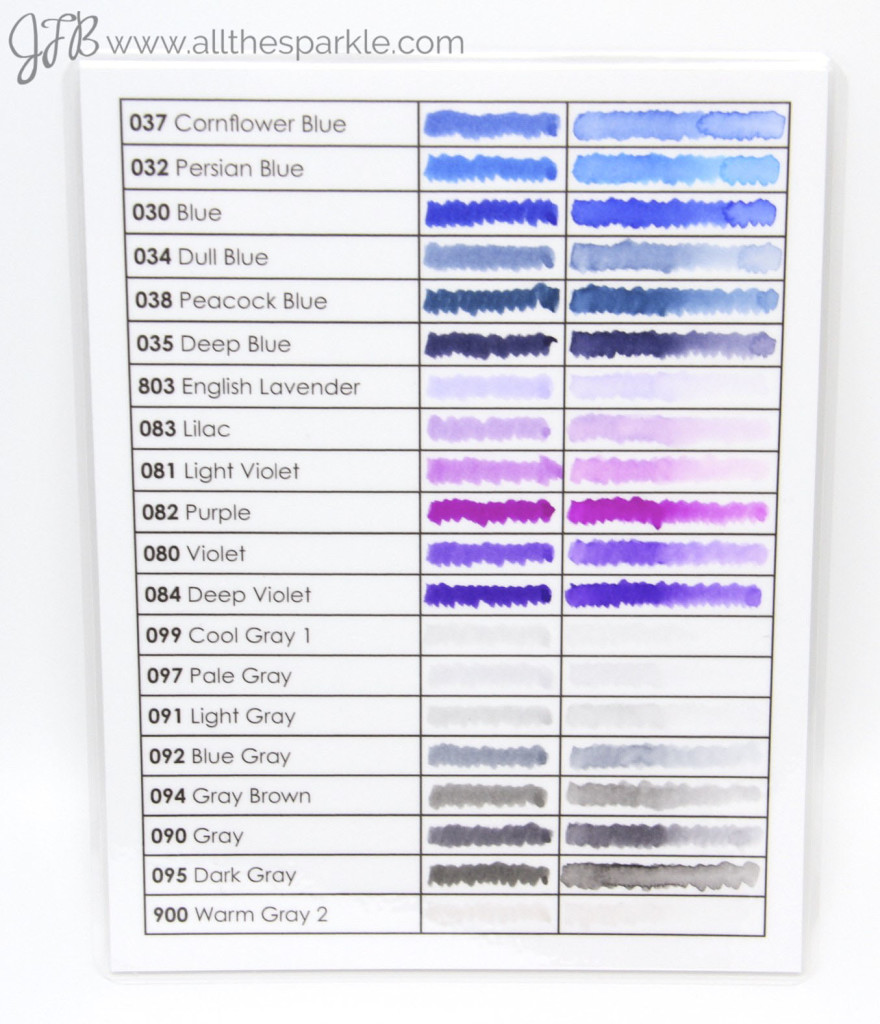
Finally, I decided to make my own Zig Clean Color Real Brush Pens Swatch Cards. I am grateful to Jennifer for the idea but they just weren’t working for me. With 80 pens I wanted to divide them equally between the 4 compartments of my storage container. Using her swatch cards meant that I couldn’t tell which markers were in which compartment and it became quite frustrating looking for the pen I wanted (of course, the discolored caps didn’t help much). I also changed around the order of the colors to better fit the way I see the colors. I printed the cards on watercolor paper, colored them, and then laminated them for greater durability. With lamination, I like that I can use the back of a swatch card as a palette while I’m working. I intentionally left a larger margin around the card so it would stand higher than the lip of the box (making it easier to pull out) but if you trimmed the margin closer it would fit inside the box without peeking over the top!
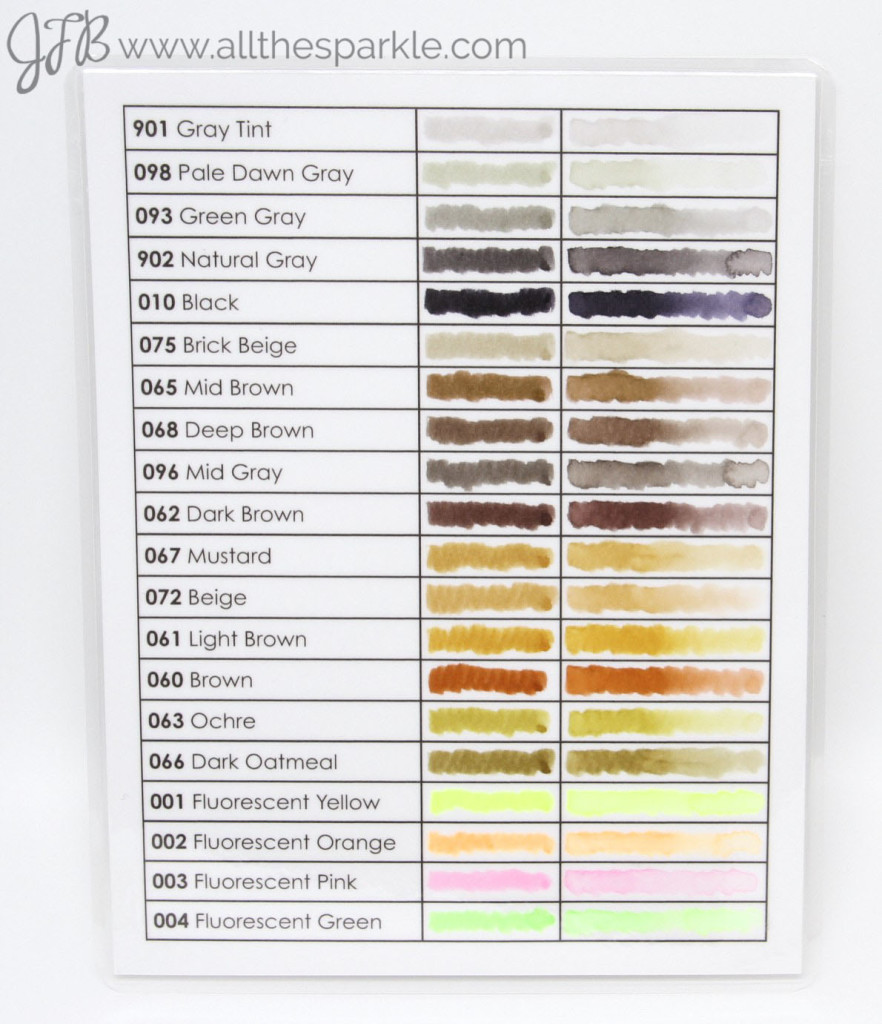 If you’re interested in using my swatch cards you can download them here: Zig Clean Color Real Brush Pens Swatch Cards! This swatch chart was created by me so please do not reproduce, sell, or distribute it without permission. It is intended for personal use only!
Anyway, I hope this post was helpful and thanks so much for visiting! 🙂




That was a great post. Thank you so much for experimenting and sharing your findings!
Aww, thank you!! 🙂
Thank you for your helpful chart on watercolor markers!
Thank you so much. Though I don’t have all the Zig markers, I plan to add more to my stash.
You’re welcome! Go get more…they’re addictive!! 😉 Ha ha #enabler
sorry my ideas didn’t work for you. 🙁
Jennifer, no worries! I use tons of your other crafty organizational ideas and they’re amazing! I’m grateful to you for the idea and glad it didn’t happen to you!!
Personally, I would love to have swatches WITH the glossy accents, as well. This way, after creating a beautiful card, I won’t ruin it by putting on glossy accents and causing a color to change and not match the rest of the card.
Great ideas and thank you for sharing the solution and your files! I only actually own 3 of these markers but plan to get more. I took a class and the markers were included. I was waiting to buy more until after the class to make sure I really liked them. I am interested in finding out where you got the container you store your markers in!
Julia, thank you! Here’s the container I used: http://amzn.to/1Sgz24T! Not too expensive on Amazon and it fits all 80 markers perfectly with room for a waterbrush or two and the swatches!
Thanks for the info and color swatch download. Just got some Zig’s today so the timing was perfect.
Please help! I’ve been trying to figure out how the markers should be stored. Do they go horizontal (as all markers seem to need to be stored) or vertical, as you picture shows? Have you any experience with wink of stella? I just read they had to be stored vertical or the tips would be blocked as the glitter settled.
Thanks!!
Cheryl
Cheryl, I store my zig markers vertical, cap-side up and have not experienced any problems. I also store the wink of stella markers the same way! Hope that helps!
Thank you SO much! I thought about the Glossy Accents when I saw JMG’s post too. I’ve noticed it distorts colors on other projects, so it makes sense that it would here too. Thanks for experimenting and giving us the info! I’m just about to purchase my first pack of these pens and am super excited! I also love how you divided the colors. Makes perfect sense to me and I plan to download and use your charts! Thanks again!!
Thank you! I thought I did something wrong! My tops have the same discoloration. Where did you get the marker storage container? Thanks for sharing!
Kassy, thanks for your comment! Over the last year I’ve also realized that the marker tops definitely fade over time no matter what method you use for the tops. I don’t think they’re lightfast. 🙁 My storage container is the Deflecto Cube…you can find it here: http://amzn.to/1YDR7sF
Thank you for sharing the color template – very nice of you! I love your storage container also, great idea. I have a feeling that somewhere on the marker it tells you the RBD value so I’m thinking it might work better to get the colors printed – perhaps they’ll be lightfast for punching out for the dots then. Thanks again for sharing all your thoughts on this, it’s greatly appreciated 🙂
I was looking for something different and these are perfect, thank you =)
Great Idea the embossing!!
Just about to get my 80 Pack and this will be brilliant, i will have mine in a wooden caddy a full shelf, so hopefully this will work for me!
but if you are confused I probably would do like the Ciao Copic markers do with the hole punch tiny numbering as i usually remember which markers and their numbers are. but we all love seeing pretty colors on our shelf!
All I can say is ‘DITTO’ to everything you just said! I LOVE this color chart and plan on using it NOW! This is how I see color and this will be so much more efficient for me. THANK YOU!
Thank You for the color chart download…really like the way you grouped like colors, much easier to find.
For now I an using the container that the markers came in and using labeling paper and a small circle punch, I added the marker number to the paper and punch each one then attached them to the marker cap. Easy to find using the numbers.
So, when I first read this post, I had just completed putting all my colored dots on my markers. Of course, at that point, all the colors under the glossy accents still matched my swatches perfectly. A couple of months ago, I realized that the colors differed a tiny bit, but not enough to cause any concern. This week, I noticed that my dots were just as bad as yours. The purples looked pink, and it appeared that I had 30 brownish/beigish-colored pens. 🙁 Today, I went through the tedious procedure of peeling off each of the dots & remaking them. I had just retaken one of Tim Holtz’s Creative Chemistry classes, and I remembered that he mentioned that you have to really pay attention to what glue you are using for precisely this reason. I thought he mentioned that Ranger’s Multi Matte Medium was a non-water soluble sealer, so I read the instructions. Sure enough, the big jar that I had just purchased indicated that it is a wonderful matte sealer. It won’t be as pretty and shiny and dimensional as Glossy Accents, but it would protect the color. I was whining to my hubby that my back hurt from redoing this tedious task. He picked up one of the pens and asked, “don’t you store these sideways?” “Yeah, why?” I asked. There’s a color indicator on the bottom. Why don’t you just store them with the bottom outwards. Ug!!!!!!!! I mostly just rely on the color chart & just needed some guidance to help me find the markers. The bottom of the marker would have worked fine!
Have to agree with the mere male there 🙂
I just came across your charts as I’m new to zig markers! I love the idea but the format is two per page and would much prefer one per page like it shows in your post. I tried everything I could think to get it one to a page but withiut a program I’m not able to. Can you tell me if there is a secret to do this or possibly send me the pdf in a different format?
Thank you!
Hi! I just wanted to say thank you very much for the swatch chart! I recently downloaded it and it is perfect the way you have the colors ordered. I also got the same storage container too! So, thank you very much for sharing!
Jessica, Thank you so much for this post! I LOVE your color swatches! Thiese have been so helpful!
Again, thank you for your generosity!
Thank you so much for sharing the color chart. Opening my Zig markers as we speak and this is just what I needed. So appreciated! 🙂
I really appreciate the time you took to create the color charts AND I really appreciate that you so graciously shared!!
I just received my markers this week, and this is exactly what I was going to do with them. thank God I didn’t. thank God you checked and thank you for posting the results here. amazing..
Thank you for the download, I was googling it when I came upon your blog so I am so happy!!
Thanks again
Thank you for sharing. I’ve just added some more of these to my collection from Bali Art Media & was searching for colour names with numbers, when I came across your post. Love the colour swatch cards. Using them to record what I have. Thank you
Thank you for the charts. I just finished laminating mine – they look great!
Thanks for the download. The chart looks good.
Thanks Jessica for a great post. I’ve seen a few bloggers color stamped images and then add glossy accents and the color of the image doesn’t quite look the same. So this is important to know for card making etc. where colored images could be covered with glossy accents.
I only have the 12 pack of Zig clean color markers so I don’t have any trouble figuring out which color is which! 🙂 However, if I eventually grow my stash, this will be priceless. Thanks again.
Thanks for your very handy swatch chart, great size too! They will fit into my storagebox perfectly.